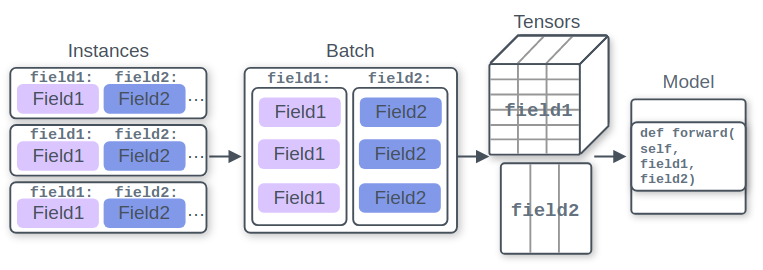
다양한 NLP Framework의 출현
Top NLP Libraries to Use 2020
AllenNLP, Fast.ai, Spacy, NLTK, TorchText, Huggingface, Gensim, OpenNMT, ParlAI, DeepPavlov
towardsdatascience.com
General Frameworks for NLP
AllenNLP
- 개발사 : Allen AI Institute
- Website : https://allennlp.org/
- Github : https://github.com/allenai/allennlp
- Backend : PyTorch
- 2018년 초반 ELMO를 발표하며 유명해진 Allen AI 사의 Framework로 GLUE Benchmark TEST와 같이 다양한 태스크로 구성된 데이터셋을 하나의 모델을 파인튜닝 하더라도 기존의 SOTA를 경신하는 성능을 보여주고자 함.

Fairseq
- 개발자 : Facebook AI Research
- Website : https://fairseq.readthedocs.io/en/latest
- Github : https://github.com/pytorch/fairseq
- Backend : PyTorch
- 자연어 처리 뿐만 아니라 CNN, LSTM 등 전통 모델에서 각종 sequantial한 데이터를 다루는 분야에 두루두루 다양한 pretrained 모델을 제공하고 있음
Fast.ai
- 개발자 : fast.ai
- Website : http://dics.fast.ai/
- Github : https://github.com/fastai/fastai
- Backend : PyTorch
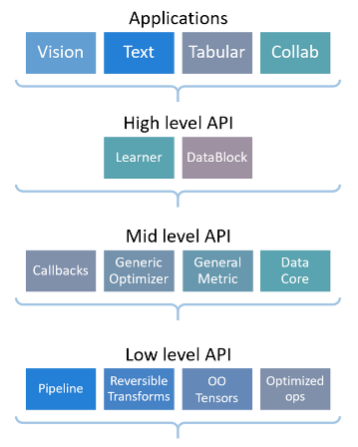
- 쉽게 모델을 구성할 수 있도록 하이레벨 API와 Aplication 블록까지 쉽게 활용할 수 있게 설계된 프레임워크

Trax
- 개발자 : Google Brain
- Website : trax-ml.readthedocs.io/en/latest/
- Github : https://github.com/google/trax
- Backend : tensorflow
- NLP pipeline을 쉽게 구성할 수 있는 프레임워크이며, 텐서플로우 유틸리티와 활용이 가능한 것이 장점으로 Tensor2Tensor가 Deprecated 되면서 Trax가 뒤를 잇게 됨
Preprocessing Libraries
Spacy
- Website : https://spacy.io/
- Github : https://github.com/explosion/spaCy
NLTK
- Website : https://www.nltk.org/
- Github : https://github.com/nltk/nltk
KoNLPy
- Website : https://konlpy.org/en/latest/
- Github : https://github.com/konlpy/konlpy
Transformer-based Framework
Huggingface transformers
- 개발자 : Huggingface.co
- Website : https://huggingface.co/transformers/
- Github : https://github.com/huggingface/transformers
- Backend : PyTorch and Tensorflow
- NLP 프레임워크 중 핵심으로 pretrain model 위주로 load하여 사용할 수 있으며, 토크나이저, 데이터셋 지원등 지원하는 범위가 더욱 광범위해지고 있음
Huggingface transformers
Why Huggingface?
1.광범위하고 신속한 NLP 모델 지원
새로운 논문이 발표 될때마다 framework에 흡수하고 있으며, 많은 pretrained model을 제공하고 dataset, tokenizer를 제공하여 쉽게 사용가능하게 지원함
2. PyTorch, Tensorflow 모두 사용 가능
기본은 PyTorch이지만 쉽게 Tensorflow로 가져올 수 있게 설계되어 어떤 프레임워크에서든 사용가능
3. 잘 설계된 framework 구조
계속해서 기능과 모델이 추가되더라도 직관적으로 사용하기 쉽게끔 만들었으며, Task나 데이터셋이 달라지더라도
비슷한 형태로 사용가능하게 API를 설계함
Huggingface transformers Model
기본적으로 모델은 PretrainedModel 클래스를 상속 받고 이를 통해 모델을 다운로드를 합니다
모델 다운로드에는 2가지 방법이 있는데 첫째는 모델을 직접 import하여 다운로드, 둘째는 AutoModel을 사용하는 방법입니다
from transformers import TFBertForPreTraining
model = TFBertForPreTraining.from_pretrained('bert-base-cased')

print(model.__class__)

#result
<class 'transformers.models.bert.modeling_tf_bert.TFBertForPreTraining'>
from transformers import TFAutoModel
model = TFAutoModel.from_pretrained("bert-base-cased")
print(model.__class__)
#result
<class 'transformers.models.bert.modeling_tf_bert.TFBertModel'>사용법은 비슷하지만 경우에 따라 Input과 Output이 달라지므로 유의해서 사용해야하며 모델 허브에서 저자가 제공한 방법을 참고해서 사용할 수 있습니다
Models - Hugging Face
huggingface.co
Huggingface transformers Tokenizer
허깅페이스는 모델 뿐만 아니라 해당 모델에 해당하는 Tokenizer 또한 준비되어 있습니다
모델의 파라미터가 동일 하더라도 Tokenizer의 토크나이징 방식과 코퍼스 데이터셋에 따라서 달라지기 때문에 모델에 맞는 토크나이저를 사용하는 것이 필수적입니다
예시)
- bert-base-uncased : BERT 모델인데, 108MB 파라미터의 기본 모델이면서, 코퍼스는 영문 대소문자 구분을 없앴다(전체 소문자화)
- bert-large-cased : BERT 모델인데, 340MB 파라미터의 대형 모델이면서, 코퍼스는 영문 대소문자 구분을 유지했다.
- bert-base-multilingual-cased : BERT 모델인데, 108MB 파라미터의 기본 모델이면서, 코퍼스는 다국어 대소문자 구분 유지했다.
from transformers import BertTokenizer
tokenizer = BertTokenizer.from_pretrained('bert-base-cased')

from transformers import AutoTokenizer
tokenizer = AutoTokenizer.from_pretrained('bert-base-cased')
토크나이저 활용 예시
encoded = tokenizer("This is Test for aiffel")
print(encoded)

#result
{'input_ids': [101, 1188, 1110, 5960, 1111, 170, 11093, 1883, 102], 'token_type_ids': [0, 0, 0, 0, 0, 0, 0, 0, 0], 'attention_mask': [1, 1, 1, 1, 1, 1, 1, 1, 1]}
batch_sentences = ["Hello I'm a single sentence",
"And another sentence",
"And the very very last one"]
encoded_batch = tokenizer(batch_sentences)
print(encoded_batch)
#result
{'input_ids': [[101, 8667, 146, 112, 182, 170, 1423, 5650, 102], [101, 1262, 1330, 5650, 102], [101, 1262, 1103, 1304, 1304, 1314, 1141, 102]], 'token_type_ids': [[0, 0, 0, 0, 0, 0, 0, 0, 0], [0, 0, 0, 0, 0], [0, 0, 0, 0, 0, 0, 0, 0]], 'attention_mask': [[1, 1, 1, 1, 1, 1, 1, 1, 1], [1, 1, 1, 1, 1], [1, 1, 1, 1, 1, 1, 1, 1]]}batch = tokenizer(batch_sentences, padding=True, truncation=True, return_tensors="tf")
print(batch)
#result
{'input_ids': <tf.Tensor: shape=(3, 9), dtype=int32, numpy=
array([[ 101, 8667, 146, 112, 182, 170, 1423, 5650, 102],
[ 101, 1262, 1330, 5650, 102, 0, 0, 0, 0],
[ 101, 1262, 1103, 1304, 1304, 1314, 1141, 102, 0]],
dtype=int32)>, 'token_type_ids': <tf.Tensor: shape=(3, 9), dtype=int32, numpy=
array([[0, 0, 0, 0, 0, 0, 0, 0, 0],
[0, 0, 0, 0, 0, 0, 0, 0, 0],
[0, 0, 0, 0, 0, 0, 0, 0, 0]], dtype=int32)>, 'attention_mask': <tf.Tensor: shape=(3, 9), dtype=int32, numpy=
array([[1, 1, 1, 1, 1, 1, 1, 1, 1],
[1, 1, 1, 1, 1, 0, 0, 0, 0],
[1, 1, 1, 1, 1, 1, 1, 1, 0]], dtype=int32)>}
Huggingface transformers Processors
현재 processors는 두가지의 메인 목적으로 존재하고 있습니다
- 첫번째로 Wav2Vec2(speech and text), CLIP(text and vision)등의 multi-modal 모델에 대한 전처리 오브젝트
- 두번째로 현재는 deprecated 되었지만 GLUE 나 SQUAD를 위한 전처리 오브젝트 입니다
해당 홈페이지를 보면 주요 목적과 API에 대한 Document를 확인할 수 있습니다
Processors
Using push_to_hub=True will synchronize the repository you are pushing to with save_directory, which requires save_directory to be a local clone of the repo you are pushing to if it’s an existing folder. Pass along temp_dir=True to use a temporary direct
huggingface.co
Huggingface transformers Config
Config는 모델을 구성하는 요소들을 명시한 json 파일로 되어있으며, 모델의 batch_size, learning_rate, weight_decay등 학습에 필요한 요소부터 각종 토크나이저에 대한 정보까지 전반적인 내용이 포함되어 있습니다
기존의 pretrained model을 사용하면 config 파일이 같이 로드되지만 설정을 바꿀 경우 따로 직접 로드해야 합니다
from transformers import BertConfig

config = BertConfig.from_pretrained("bert-base-cased")
print(config.__class__)
print(config)

#result
<class 'transformers.models.bert.configuration_bert.BertConfig'>
BertConfig {
  "architectures": [
    "BertForMaskedLM"
  ],
  "attention_probs_dropout_prob": 0.1,
  "classifier_dropout": null,
  "gradient_checkpointing": false,
  "hidden_act": "gelu",
  "hidden_dropout_prob": 0.1,
  "hidden_size": 768,
  "initializer_range": 0.02,
  "intermediate_size": 3072,
  "layer_norm_eps": 1e-12,
  "max_position_embeddings": 512,
  "model_type": "bert",
  "num_attention_heads": 12,
  "num_hidden_layers": 12,
  "pad_token_id": 0,
  "position_embedding_type": "absolute",
  "transformers_version": "4.11.3",
  "type_vocab_size": 2,
  "use_cache": true,
  "vocab_size": 28996
}
from transformers import AutoConfig
config = AutoConfig.from_pretrained("bert-base-cased")
print(config.__class__)
print(config)
#result
<class 'transformers.models.bert.configuration_bert.BertConfig'>
BertConfig {
"architectures": [
"BertForMaskedLM"
],
"attention_probs_dropout_prob": 0.1,
"classifier_dropout": null,
"gradient_checkpointing": false,
"hidden_act": "gelu",
"hidden_dropout_prob": 0.1,
"hidden_size": 768,
"initializer_range": 0.02,
"intermediate_size": 3072,
"layer_norm_eps": 1e-12,
"max_position_embeddings": 512,
"model_type": "bert",
"num_attention_heads": 12,
"num_hidden_layers": 12,
"pad_token_id": 0,
"position_embedding_type": "absolute",
"transformers_version": "4.11.3",
"type_vocab_size": 2,
"use_cache": true,
"vocab_size": 28996
}모델에서 직접 config를 뽑아낼 수도 있습니다
model = TFBertForPreTraining.from_pretrained('bert-base-cased')

config = model.config
print(config.__class__)
print(config)

#result
<class 'transformers.models.bert.configuration_bert.BertConfig'>
BertConfig {
  "_name_or_path": "bert-base-cased",
  "architectures": [
    "BertForMaskedLM"
  ],
  "attention_probs_dropout_prob": 0.1,
  "classifier_dropout": null,
  "gradient_checkpointing": false,
  "hidden_act": "gelu",
  "hidden_dropout_prob": 0.1,
  "hidden_size": 768,
  "initializer_range": 0.02,
  "intermediate_size": 3072,
  "layer_norm_eps": 1e-12,
  "max_position_embeddings": 512,
  "model_type": "bert",
  "num_attention_heads": 12,
  "num_hidden_layers": 12,
  "pad_token_id": 0,
  "position_embedding_type": "absolute",
  "transformers_version": "4.11.3",
  "type_vocab_size": 2,
  "use_cache": true,
  "vocab_size": 28996
}
Huggingface transformers Trainer
trainer는 모델을 학습하기 위한 클래스로 training, fine-tuning, evaluation 모두 사용이 가능합니다
이 방법을 활용하면 TrainingArguments를 활용해 Huggingface에서 제공하는 기능을 통합적으로 커스터 마이징하여 모델을 학습할 수 있는 장점이 있습니다
케라스 모델로 사용하는 예시
import tensorflow as tf
from transformers import TFAutoModelForPreTraining, AutoTokenizer
tokenizer = AutoTokenizer.from_pretrained('bert-base-cased')
model = TFAutoModelForPreTraining.from_pretrained('bert-base-cased')

sentence = "Hello, This is test for bert TFmodel."

input_ids = tf.constant(tokenizer.encode(sentence, add_special_tokens=True))[None, :]  # Batch size 1

optimizer = tf.keras.optimizers.Adam(learning_rate=3e-5)
loss = tf.keras.losses.SparseCategoricalCrossentropy(from_logits=True)

model.compile(optimizer=optimizer, loss=loss)
pred = model.predict(input_ids)

print("=====Results=====")
print(pred)


=====Results=====
TFBertForPreTrainingOutput(loss=None, prediction_logits=array([[[ -7.402721 ,  -7.362659 ,  -7.4500127, ...,  -6.1955233,
          -5.894807 ,  -6.3672695],
        [ -7.828724 ,  -8.0582285,  -7.864206 , ...,  -6.419408 ,
          -6.3024364,  -6.7624674],
        [-11.549931 , -11.551905 , -11.484696 , ...,  -8.114805 ,
          -8.314197 ,  -9.4444475],
        ...,
        [ -3.2660656,  -3.7416406,  -2.5797932, ...,  -4.0109997,
          -2.4964375,  -3.0753887],
        [-12.231965 , -12.027048 , -11.797831 , ...,  -8.838844 ,
          -9.09165  , -10.497256 ],
        [-10.639945 , -11.074341 , -11.0361   , ...,  -8.148463 ,
          -9.585199 , -10.67151  ]]], dtype=float32), seq_relationship_logits=array([[ 1.6309196 , -0.71684647]], dtype=float32), hidden_states=None, attentions=None)
TFTrainer 사용 예시
from dataclasses import dataclass, field
from enum import Enum
from typing import Dict, Optional
import tensorflow as tf
import tensorflow_datasets as tfds
from transformers import (
    TFAutoModelForSequenceClassification,
    TFTrainer,
    TFTrainingArguments,
    AutoConfig,
    AutoTokenizer,
    glue_convert_examples_to_features,
)

# TFTrainingArguments 정의
training_args = TFTrainingArguments(
    output_dir='./results',              # output이 저장될 경로
    num_train_epochs=1,              # train 시킬 총 epochs
    per_device_train_batch_size=16,  # 각 device 당 batch size
    per_device_eval_batch_size=64,   # evaluation 시에 batch size
    warmup_steps=500,                # learning rate scheduler에 따른 warmup_step 설정
    weight_decay=0.01,                 # weight decay
    logging_dir='./logs',                 # log가 저장될 경로
    do_train=True,                        # train 수행여부
    do_eval=True,                        # eval 수행여부
    eval_steps=1000
)

# model, tokenizer 생성
model_name_or_path = 'bert-base-uncased'
with training_args.strategy.scope():    # training_args가 영향을 미치는 model의 범위를 지정
    model = TFAutoModelForSequenceClassification.from_pretrained(
            model_name_or_path,
            from_pt=bool(".bin" in model_name_or_path),
        )
tokenizer = AutoTokenizer.from_pretrained(
        model_name_or_path,
    )
# 데이터셋 생성
ds, info = tfds.load('glue/mrpc', with_info=True)
train_dataset = glue_convert_examples_to_features(ds['train'], tokenizer, 128, 'mrpc')
train_dataset = train_dataset.apply(tf.data.experimental.assert_cardinality(info.splits['train'].num_examples))
# TFTrainer 생성
trainer = TFTrainer(
model=model, # 학습시킬 model
args=training_args, # TFTrainingArguments을 통해 설정한 arguments
train_dataset=train_dataset, # training dataset
)
# 학습 진행
trainer.train()
# 테스트
test_dataset = glue_convert_examples_to_features(ds['test'], tokenizer, 128, 'mrpc')
test_dataset = test_dataset.apply(tf.data.experimental.assert_cardinality(info.splits['test'].num_examples))
trainer.evaluate(test_dataset)
'23년 이전 글 > 모두의연구소 아이펠' 카테고리의 다른 글
| 아이펠(AIFFEL)에서 비전공으로 통계데이터 활용 대회 수상 후기 (2) | 2022.05.12 |
|---|---|
| BERT Pretrain with TPU (0) | 2022.04.19 |
| 기계 번역의 흐름 (0) | 2022.04.08 |
| Attention to Transformers (0) | 2022.04.04 |
| Attention translator (0) | 2022.04.04 |
