주중에 2번, Exploration을 하는 날입니다 오늘로 7번째 Exploration이네요
오늘의 노드에서는 CV를 활용해서 아웃포커싱 기능과, 합성 기능을 주로 했습니다
여기에서 CV는 상상에 맡기도록 하겠습니다
먼저 오늘 주로 쓰게 될 라이브러리는 다음과 같습니다
import os
import urllib
import cv2
import numpy as np
from pixellib.semantic import semantic_segmentation
from matplotlib import pyplot as plt
Pixellib은 처음인데?
PointRend를 활용해서 이미지와 비디오에 대해서 인스턴스 분할을 해주는 친구라고 하는데 역시 말로만 보면 이해하기가 어려우니 일단 써보고 나서 생각해봅니다
저번에는 셀카로 찍었는데 더이상은 셀카 찍기가 부담되어 다른 게스트 분들을 모셨습니다
거대고양이 불러오기
img_path = '/aiffel/aiffel/human_segmentation/images/tiger.jpg'
img_orig = cv2.imread(img_path)

print(img_orig.shape)
plt.imshow(cv2.cvtColor(img_orig, cv2.COLOR_BGR2RGB))
plt.show()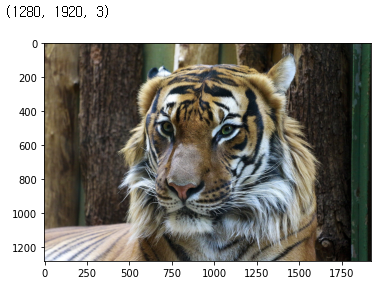
Load Pretrained Model
바닥부터 훈련시키는건 손이 많이가니 학습된 모델을 불러옵니다
import requests
model_dir = '/aiffel/aiffel/human_segmentation/models'
model_file = os.path.join(model_dir, 'deeplabv3_xception_tf_dim_ordering_tf_kernels.h5')
model_url = 'https://github.com/ayoolaolafenwa/PixelLib/releases/download/1.1/deeplabv3_xception_tf_dim_ordering_tf_kernels.h5'
# 모델 다운로드
res = requests.get(model_url)
with open(model_file, 'wb') as model:
    model.write(res.content)
모델을 다운로드 하는 방법에는 urllib을 사용하는 방법도 있습니다만 편하신 방법으로 하면 될 듯 합니다
wget 명령어도 사용하기 편리합니다
불러온 모델에 다운 받은 h5 파일은 불러오고, 이미지에 대해서 detection을 실시합니다
아래에 LABEL_NAMES안에서 값을 반환하게 됩니다
model = semantic_segmentation()
model.load_pascalvoc_model(model_file)

segvalues, output = model.segmentAsPascalvoc(img_path)

# 사전 학습된 모델의 레이블 클래스
LABEL_NAMES = [
    'background', 'aeroplane', 'bicycle', 'bird', 'boat', 'bottle', 'bus',
    'car', 'cat', 'chair', 'cow', 'diningtable', 'dog', 'horse', 'motorbike',
    'person', 'pottedplant', 'sheep', 'sofa', 'train', 'tv'
]
len(LABEL_NAMES)

plt.imshow(output)
plt.show()
# 예측한 모델 값
segvalues
class를 0, 8, 12로 예측했는데 뭔지 봐야 알겠죠
예측된 클래스 확인
거의 정확하게 나왔네요 우린 고양이를 보고 있는거니까요 dog은 아마도 몸통부위를 dog이라고 본 듯 합니다
# 예측한 레이블들
for class_id in segvalues['class_ids']:
    print(LABEL_NAMES[class_id])

#result
background
cat
dog
컬러맵 만들기
코드는 정확하게 이해 못했지만, 각 레이블 클래스에 대해서 컬러맵을 만드는 과정입니다 원하는 object를 떼어낼때 해당 컬러맵을 사용하면 편하게 떼어낼 수 있습니다
colormap = np.zeros((256,3), dtype=int)
ind = np.arange(256, dtype=int)

for shift in reversed(range(8)):
    for channel in range(3):
        colormap[:, channel] |= ((ind >> channel) & 1)  << shift
    ind >>= 3

colormap[:20]
레이블과 해당하는 컬러맵 확인
LABEL_NAMES
#result
['background', 'aeroplane', 'bicycle', 'bird',
'boat', 'bottle', 'bus', 'car', 'cat', 'chair',
'cow', 'diningtable', 'dog', 'horse', 'motorbike',
'person', 'pottedplant', 'sheep', 'sofa', 'train', 'tv']

#LABEL_NAMES에서 cat 인덱스 확인
colormap[8]

#result
array([64,  0,  0])

#cv2는 BGR로 나오므로, B값과 R값 변경
seg_color = (0,0,64)
이미지 추출 확인
고양이가 성공적으로 추출 되었습니다
seg_map = np.all(output==seg_color, axis=-1)
print(seg_map.shape)
plt.imshow(seg_map, cmap='gray')
plt.show()
원본과 겹쳐보기
훌륭한 성능을 보여주고 있습니다 조금 잘린 부분이 있지만 여전히 거대하네요
img_show = img_orig.copy()
# True, False인 값을 255와 0으로
img_mask = seg_map.astype(np.uint8) * 255
# 255와 0을 적당한 색으로 변경
color_mask = cv2.applyColorMap(img_mask, cv2.COLORMAP_JET)
# 원본 이미지와 마스트 합성 원본0.6, 마스트0.4
img_show = cv2.addWeighted(img_show, 0.6, color_mask, 0.4, 0.0)
plt.imshow(cv2.cvtColor(img_show, cv2.COLOR_BGR2RGB))
plt.show()
배경 블러 처리
img_orig_blur = cv2.blur(img_orig,(30,30)) # 괄호안에 값이 커질수록 블러가 강해짐
plt.imshow(cv2.cvtColor(img_orig_blur, cv2.COLOR_BGR2RGB))
plt.show()
Detected Object 준비
# 기존에 마스킹된 이미지
img_mask_color = cv2.cvtColor(img_mask, cv2.COLOR_GRAY2BGR)
plt.imshow(img_mask_color)
Detected Object 반전
# 백그라운드와 반전
img_bg_mask = cv2.bitwise_not(img_mask_color)
plt.imshow(img_bg_mask)
반전된 이미지를 배경과 합성
이미지간의 비트연산을 활용해서 하는 방법인데 저렇게 원본이 들어갈 자리를 비워두면
# 기존 블러된 이미지와 결합 img_bg_mask값이 0
img_bg_blur = cv2.bitwise_and(img_orig_blur, img_bg_mask)
plt.imshow(img_bg_blur)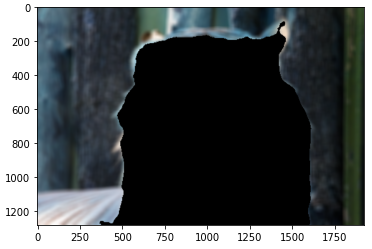
최종 합성
img_concat = np.where(img_mask_color==255, img_orig, img_bg_blur)
plt.imshow(cv2.cvtColor(img_concat, cv2.COLOR_BGR2RGB))
plt.show()
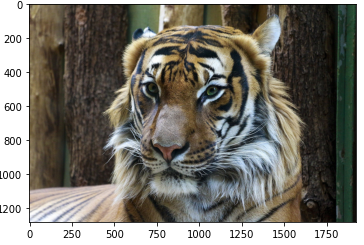
원본대비 훨씬 강렬해진 고양이를 느낄 수 있습니다
하나만 하면 재미없으니까, 한번 더 해보도록 하죠
거대한 맹수 사진 준비
맹수가 털을 다듬고 있는 사진을 볼 수가 있습니다 화가 잔뜩 나있는 상태네요
img_path = '/aiffel/aiffel/human_segmentation/images/madong.png'
img_orig = cv2.imread(img_path)

print(img_orig.shape)
plt.imshow(cv2.cvtColor(img_orig, cv2.COLOR_BGR2RGB))
plt.show()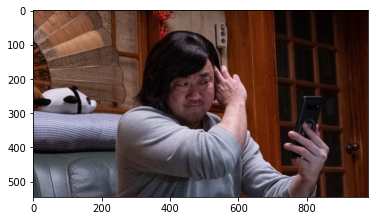
Object detection
모델은 불러와있기 때문에 바로 detection 해보겠습니다 색깔이 다르게 나온걸 보니 구분이 잘 되었네요
segvalues, output = model.segmentAsPascalvoc(img_path)
plt.imshow(output)
plt.show()
예측 레이블
맹수와 사람을 헷갈려하긴 하네요 그래도 sofa까지 확인하는 걸 보니 성공적 입니다
# 예측한 레이블들
for class_id in segvalues['class_ids']:
    print(LABEL_NAMES[class_id])

background
person
sofa
컬러맵
사람이 아니긴 하지만 일단 사람으로 예측했으니, 사람의 컬러맵을 활용해야 이미지를 가져올 수 있습니다
# 사람 컬러맵 확인
colormap[15]

#result
array([192, 128, 128])

# 컬러맵 뒤집기 BGR 순서를 RGB로
seg_color = (128,128,192)
이미지 확인
# 이미지 추출 확인
seg_map = np.all(output==seg_color, axis=-1)
print(seg_map.shape)
plt.imshow(seg_map, cmap='gray')
plt.show()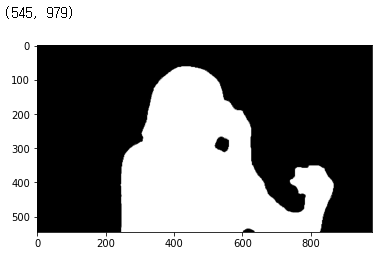
원본과 확인해보기
# 원본과 합쳐보기
img_show = img_orig.copy()
# True, False인 값을 255와 0으로
img_mask = seg_map.astype(np.uint8) * 255
# 255와 0을 적당한 색으로 변경
color_mask = cv2.applyColorMap(img_mask, cv2.COLORMAP_JET)
# 원본 이미지와 마스트 합성 원본0.6, 마스트0.4
img_show = cv2.addWeighted(img_show, 0.6, color_mask, 0.4, 0.0)
plt.imshow(cv2.cvtColor(img_show, cv2.COLOR_BGR2RGB))
plt.show()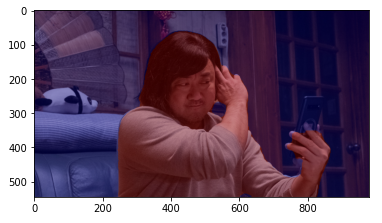
최종
img_orig_blur = cv2.blur(img_orig,(30,30))
plt.imshow(cv2.cvtColor(img_orig_blur, cv2.COLOR_BGR2RGB))
plt.show()
# 기존에 마스킹된 이미지
img_mask_color = cv2.cvtColor(img_mask, cv2.COLOR_GRAY2BGR)
plt.imshow(img_mask_color)
# 백그라운드와 반전
img_bg_mask = cv2.bitwise_not(img_mask_color)
plt.imshow(img_bg_mask)
# 기존 블러된 이미지와 결합 img_bg_mask값이 0
img_bg_blur = cv2.bitwise_and(img_orig_blur, img_bg_mask)
plt.imshow(img_bg_blur)
img_concat = np.where(img_mask_color==255, img_orig, img_bg_blur)
plt.imshow(cv2.cvtColor(img_concat, cv2.COLOR_BGR2RGB))
plt.show()
성공적으로 아웃포커싱 효과 완수를 하였습니다 포토샵을 배우지 않아도 될 듯 합니다
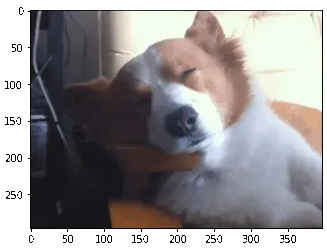
마지막 크로마키 시도
크로마키를 시도하는 내용이 있어서 역시 도전해보았습니다 작품명은 인셉션 댕댕이
코드는 다른게 없기 때문에 이미지 변화만 첨부해볼께요
오늘도 수고하셨습니다~!
'23년 이전 글 > 모두의연구소 아이펠' 카테고리의 다른 글
| -23일차- Text Summarization (0) | 2022.01.27 |
|---|---|
| -22일차- 비지도 학습 (0) | 2022.01.26 |
| -20일차- 회귀(Regression)에 관하여 (0) | 2022.01.24 |
| -18일차- 딥러닝과 신경망 (0) | 2022.01.19 |
| 아이펠 인공지능 교육과정 중간 회고 (0) | 2022.01.14 |
